 |
Introduction
BarStock's Data Analysis functionality allows you to quickly and easily browse, edit, import and export stock and financial data.
The Stock Analysis window allows you to view and edit financial and stock detail for a selected Stock Period and includes comparisons with Actual sales readings if available.
- Stock Details: shows opening stock, deliveries, transfers, wastage and closing stock and expected sales with a comparison against actual sales if data is available.
- Financial Breakdown: shows financials (as above) for each product.
- Financial Summary: shows financials against each product type and compares against Receipts, Allowances and/or Actual Sales.
- Receipts/Allowances: allows you to set Receipts, Wastage and other data for this period.
- Till Readings: allows you to browse, add and edit Till/Epos readings associated with this stock period.
- Other Reports: allows you to generate other reports.
Till Readings window allows you to quickly view, input or import actual sales readings from Epos or Till Systems. These don't have to be related to a particular stock period.
Till Reading Selection window allows you to assign a set of readings to a particular stock period if required.
Stock Analysis
This allows you to view and edit financial and stock detail for a selected Stock Period and includes comparisons with Actual sales readings if available.
- Stock Details: shows opening stock, deliveries, transfers, wastage and closing stock and expected sales with a comparison against actual sales if data is available.
- Financial Breakdown: shows financials for each product - showing Cost, Expected Sales and GP (as a pecentage of sales less VAT) and compares against Actual Sales if available.
- Financial Summary: shows financials against each product type - showing Cost, Expected Sales and GP (as a pecentage of sales less VAT) and compares against Actual Sales if available.
- Receipts/Allowances: allows you to set Receipts, Wastage and other data for this period.
- Till Readings: allows you to browse, add and edit Till/Epos readings associated with this stock period.
- Other Reports: allows you to generate other types of reports or use the Report Wizard to generate reports over a number of locations or stock periods.
Click on the Data Analysis icon ![]() or select Stock Data Analysis from the
File menu and this will show the Stock Analysis window:
or select Stock Data Analysis from the
File menu and this will show the Stock Analysis window:
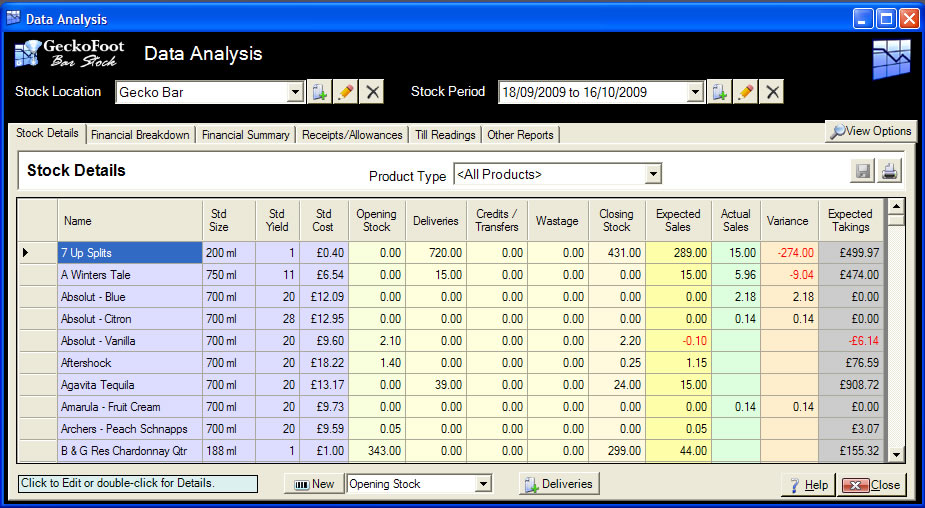
Stock Analysis Window
Select the Stock Location and Stock Period you wish to look at from the drop down lists and the details will be shown for that period.
The Stock Location is the bar, stock room or venue which contains the stock which you are counting or measuring:
Click ![]() to Add a new location, click
to Add a new location, click ![]() to change an existing location's name or click
to change an existing location's name or click ![]() to delete a location.
to delete a location.
The Stock Period is the period of time which you are measuring in terms of stock usage:
Click ![]() to start a new period, click
to start a new period, click ![]() to change the dates for an existing period or click
to change the dates for an existing period or click ![]() to delete an existing period
to delete an existing period
Click Close to close the window, Help or F1 to show help on the selected tab.
Jump to the relevant tab: Stock Details, Financial Breakdown, Financial Summary, Reciepts/Allowances, Till Readings, Other Reports.
Stock Details
The first tab shows the stock details for the product in terms of bottles, crates or barrels (or other standard measure):
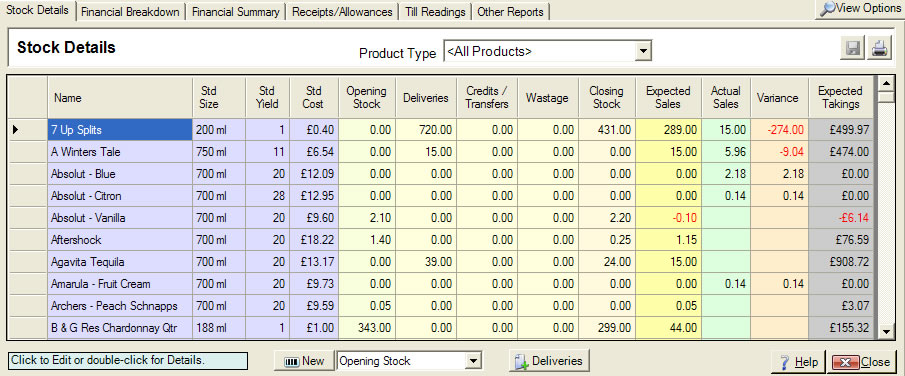
Stock Details
You can select the Product
The columns are as follows:
- Product Name - name of the product.
- Std Size - the standard size or Volume of the Items in stock as bought into the business (e.g. Bottle, Case, Barrell).
- Std Yield - the number of units available for sale in each item sold - i.e. Item Vol / Unit Vol.
- Opening Stock - the stock at the beginning of the stock period, normally carried over from the Closing Stock of the previous period.
- Deliveries - the number of items brought into the business or location.
- Credits/Transfers - the number of items credited or transferred to another location.
- Wastage - the number of items declared as wasted or given as complementary drinks.
- Closing Stock - the stock at the end of the stock period.
- Expected Sales - the number of items sold based on the figures above.
- Expected Takings - the expected takings based on expected sales.
The following columns are only used if you have imported or entered Till or EPOS system readings for this Stock Period:
- Actual Sales - the actual sales based on till readings or values entered by the user.
- Variance - the difference in Expected and Actual Sales measured in whole bottles, cases etc.
Click on ![]() to Print or Export the view to Microsoft Excel or other formats.
to Print or Export the view to Microsoft Excel or other formats.
Double-click on any product information to edit details such as Item or Unit Volume.
Double-click on Stock detail to show the Stock Readings for the product.
Double-click on Actuals to view any Till Readings for that product.
Double-click on Expected Takings to show financial breakdown.
Edit Stock and Actual Values
For Opening Stock, Deliveries, Transfers Out, Wastage, Closing Stock or Actual Sales, you can click inside the highlighted box to edit values directly.
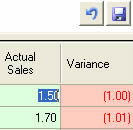
Edit Stock
Enter the new values in any of the stock or actuals columns and click ![]() to Save or click
to Save or click ![]() to Undo all your changes.
to Undo all your changes.
NOTE: When you update stock data on this view - any existing readings for that product will be replaced by a single new reading. You can alternatively double-click to show all readings and add new or edit existing readings on the Reading Form. New Actual Sales values will be associated with the default till name - "<Location Name> Till" (e.g. "Gecko Bar Till").
Financial Breakdown
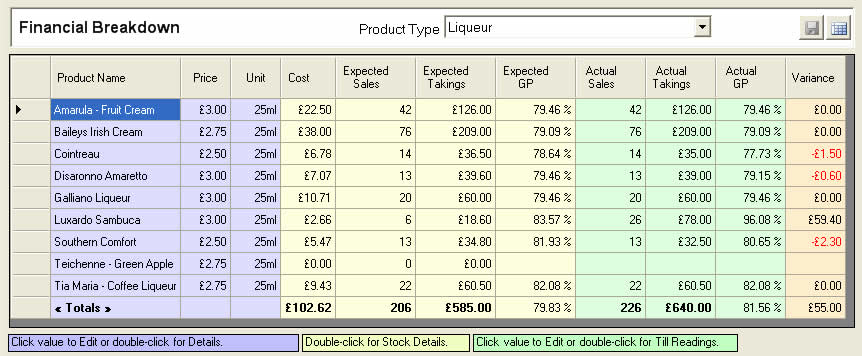
The second tab on the Stock Analysis window show the breakdown of Financial details for individual products:
Figure
41
- Financial Breakdown
You can select the Product
The columns are as follows:
- Product Name - name of the product.
- Price - the Bar price of a unit used to calculate takings.
- Unit - the size of a standard unit, used to calculate the Expected unit sales based on change in stock levels etc.
- Cost - the cost of the quantity of that product which were sold or lost from the location during the stock period.
- Expected Sales - the number of unit sales expected to have been sold based on stock levels and declared wastage.
- Expected Takings - the expected takings based on expected sales and the registered bar price for the product.
- Expected GP - the Profit Margin for that product as a whole based on expected takings and cost, often known as GP.
The following columns are only used if you have imported or entered Till or EPOS system readings for this Stock Period:
- Actual Sales - actual unit sales for the product as entered by the user or imported from Till systems.
- Actual Takings - takings based on actual unit sales and registered product price.
- Actual GP - the Profit Margin for that product based on actualtakings and cost.
- Variance - the difference in Expected and Actual takiings to highlight any issues or errors.
Click on ![]() to Print or Export the view to Microsoft Excel or other formats.
to Print or Export the view to Microsoft Excel or other formats.
Double-click on any product information to edit details such as Unit Volume or Bar Price.
Double-click on detail to show the Stock Details for the product.
Edit Actual Values
For Actual Sales or Takings, you can click inside the highlighted box to edit values directly.
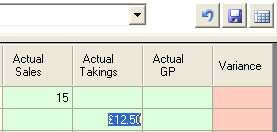
Edit Actuals
Enter the new values in any of the stock or actuals columns and click ![]() to Save or click
to Save or click ![]() to Undo all your changes.
to Undo all your changes.
When you save all actual and variance values will be updated based on the values you enter:
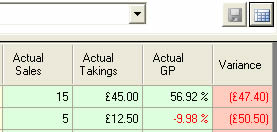
Edit Actuals
NOTE: When you update actuals on this view - any existing Till Readings for that product or period will be replaced by a single new reading. You can alternatively double-click to view readings on the Till Reading tab. New Actual Sales values will be associated with the default till name - "<Location Name> Till" (e.g. "Gecko Bar Till").
Financial Summary
This shows financials against each product type - showing Cost, Expected Sales and GP (as a pecentage of sales less VAT) and compares against Actual Sales if available.
It also shows the totals accross all products types for the selected period.
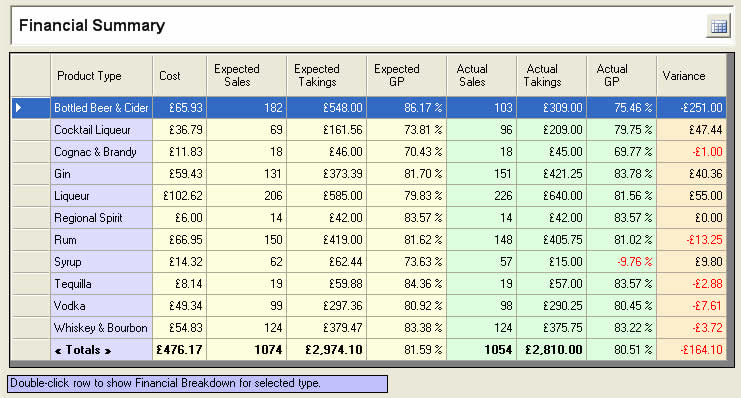
Financial Summary
The calculated columns are as follows:
- Cost - the cost of the items of that type which were sold or lost from the location during the stock period.
- Expected Sales - the number of unit sales expected to have been sold based on stock levels and declared wastage.
- Expected Takings - the expected takings based on expected sales and the registered bar price for each product.
- Expected GP - the Profit Margin for that product type as a whole based on expected takings and cost, often known as GP.
The following columns are only used if you have imported or entered Till or EPOS system readings for this Stock Period:
- Actual Sales - actual unit sales for the product type as entered by the user or imported from Till systems.
- Actual Takings - takings based on actual unit sales and registered product price.
- Actual GP - the Profit Margin for that product type as a whole based on actualtakings and cost.
- Variance - the difference in Expected and Actual takiings to highlight any issues or errors.
Click on ![]() to Print or Export the view to Microsoft Excel or other formats.
to Print or Export the view to Microsoft Excel or other formats.
Click on the VAT/Sales Tax amount to change the VAT or Sales Tax rate used when calculating GP (or Profit Margin) for comparison between products.
Double click on a Product Type row to show a Financial Breakdown for that type.
Receipts/Allowances
If available, the fourth tab allows you to input and edit receipts and various allowances for a specific stock period.
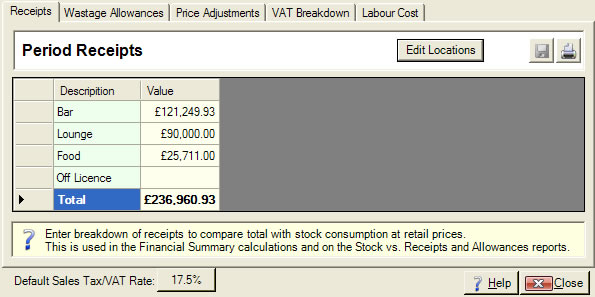
Receipts/Allowances
There are a number of different allowances and values you can set and these are all fed into various summary views or reports which can be generated.
These are all optional and may not be used be all users - a description is shown on the base of each tab.
- Receipts - this allows you to show a breakdown of your receipts and shows total receipts for that period.
- Wastage Allowances - this allows you to enter total permitted wastage allowances.
- Price Adjustments - this allows you to enter any financial adjustments to account for higher or lower discount prices.
- VAT Breakdown - this allows you to account for different VAT rates on your receipts if appropriate.
- Labour Cost - this allows you to calculate labour costs for the period which are shown on the Financial Summary.
The default VAT Rate
Period Receipts
Period Receipts allow you to input and show a breakdown of your receipts with the total for that period.
These receipts are shown on the Stock vs. Receipts reports and on the Financial Summary.

Period Receipts
Click Edit Locations to change the names or add or remove locations appropriate for this stock period or venue.
Enter the value and click ![]() to save the value or
to save the value or ![]() to undo your changes.
to undo your changes.
Wastage Allowances
Wastage Allowances allows you to enter total tollerated waste when comparing consumption against receipts.
These are shown on the Stock vs. Receipts reports and on the Financial Summary.
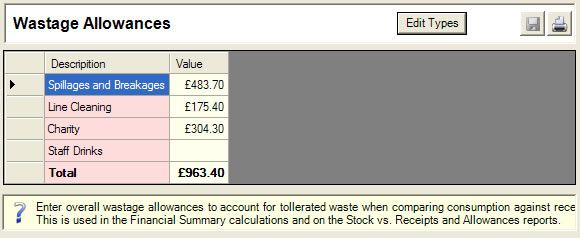
Wastage Allowances
Click Edit Types to change the names or add or remove name of different types or wastage appropriate for this stock period or venue.
Enter the value and click ![]() to save the value or
to save the value or ![]() to undo your changes.
to undo your changes.
Price Adjustments
Price Adjustments optionally allow you to enter any financial adjustments to account for higher late night prices or lower discount prices e.g. for happy hours or off-license sales.
These are shown on the Stock vs. Receipts reports and on the Financial Summary.
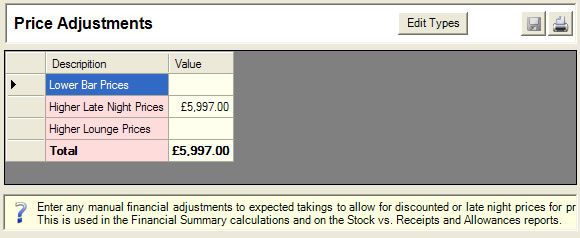
Price Adjustments
Click Edit Types to change the names or add or remove name of different types or price adjustments for this stock period or venue.
Enter the value and click ![]() to save the value or
to save the value or ![]() to undo your changes.
to undo your changes.
VAT Breakdown
VAT Breakdown allows you to account for different VAT rates on your receipts if appropriate.
These are shown on the Stock vs. Receipts reports and on the Financial Summary.
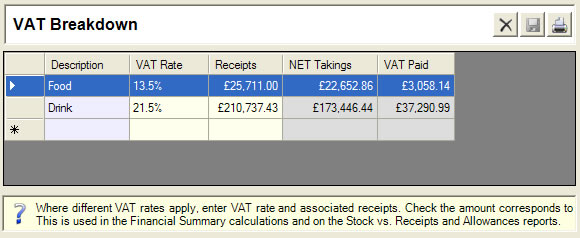
Price Adjustments
You can type a description for the VAT rate to apply - e.g. Food, Drink, Take-Away Food etc.
Note that for most UK licensed business this is not generally used but is needed for the Republic of Ireland and other countries.
Type in a new description to create a new row. Enter or change the VAT Rate and Receipts taken associated with that VAT rate. Click ![]() to save the values or click to
to save the values or click to ![]() undo your changes. NET Takings and VAT Paid will be updated automatically.
undo your changes. NET Takings and VAT Paid will be updated automatically.
Labour Cost
Labour Cost - this allows you to calculate labour costs if required for the period which can be shown on the Financial Summary.

Labour Cost
These are seperated into salaried and hourly labour costs. Click on Edit Employees on either to add or edit existing employees. Enter the number of hours and the gross hourly or annual salary.
Click ![]() to save the values or click to
to save the values or click to ![]() undo your changes. Total and Period costs will be updated automatically.
undo your changes. Total and Period costs will be updated automatically.
Till Readings
The fourth or fifth tab shows any till readings or actual sales which have been entered or imported for this stock period:
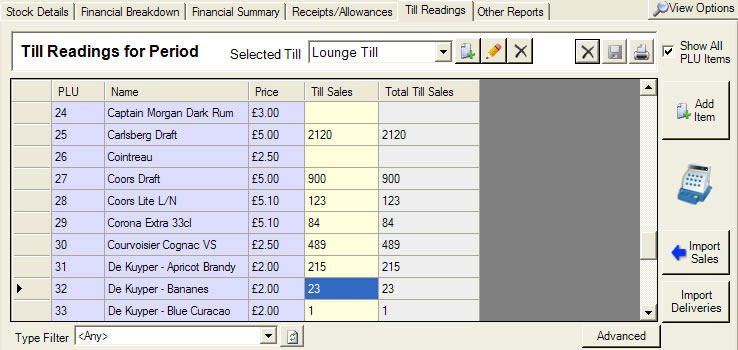
Till Readings
You can have any number of seperate tills or use a single till if you have an integrated till system.
Select the current till from the drop down list or click ![]() to create a new till, click
to create a new till, click ![]() to edit the till name or click
to edit the till name or click ![]() to delete the till and all associated readings.
to delete the till and all associated readings.
Each row shows a sales item and the till sales and total sales for this location and stock period.
A sales item can be a product associated with a size (e.g. half pint of Carling) or a whole recipe or grouping of different products (e.g. a Cosmopolitan).
The columns for the view are as follows:
- PLU - the Price Look-Up code of the product. These are identifying numbers used to refer to a product by Till and EPOS systems. These can be left blank if not used.
- Name - the name of the sales item, the product and size, recipe or grouping.
- Price - the standard price of the sales item.
- Till Sales - the number of unit sales indicated by this Till or EPOS system.
- Total Till Sales - the total number of till sales for the sales period.
Check Show All PLU Items to show all PLU or Sales Items regardless of whether they have any till readings associated with them.
Click Add Item to search for or create a new PLU Sales Item.
Click to edit Sales Item details, PLU, Name or Price or double-click to edit full details.
Click to edit Till Sales. Once finished click ![]() to Save or
to Save or ![]() to Undo your changes.
to Undo your changes.
Click Import Sales to load readings from file or from connected Till or EPOS system.
Click Import Deliveries to load deliveries from file or from connected Till or EPOS system.
Click Select Existing Readings to show all Tills and their reading times and select which readings should be used for this period.
Other Reports
The last tab allows you to generate Advanced Reports or create Custom Views of the data.
Advanced Reports
Select a report type from the drop down list and a description and a preview of the report type is shown:
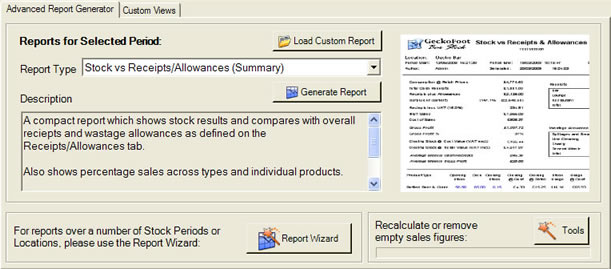
Advanced Reports
Click Generate Report to generate the selected reports for the current stock period.
The new report is shown in a Report Form.
Click Report Wizard to generate a report over a number of Locations or Periods.
Housekeeping Tools allow you to force the removal of empty readings or recalculation of total figures.
These are generally not required, but we may ask you to use these if
we are tracking down issues.
Custom Views
Custom Views allow you to create your own views of the stock data and results.
There are two types of custom view - select which type you wish to view:
- Product Breakdown - this shows all products and can be filtered by product type.
- Summary - this shows a summary accross product types.
Click Customise to change the columns displayed and this opens the Customise form.
Product Breakdown
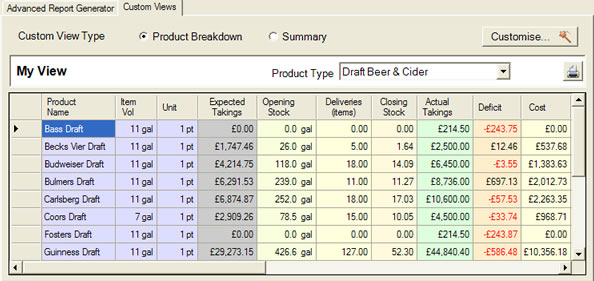
Product Breakdown
Clicking Product Breakdown will show all products and allow you to select the Product Type to filter.
Click ![]() to Print or Export the view into Excel or other formats. Click Customise to change the columns displayed.
to Print or Export the view into Excel or other formats. Click Customise to change the columns displayed.
Summary
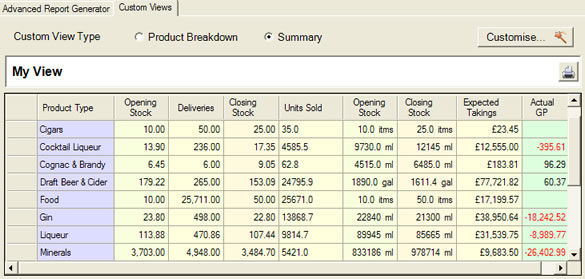
Advanced Reports
Clicking Summary will show the totals for each product type.
Click ![]() to Print or Export the view into Excel or other formats. Click Customise to change the columns displayed.
to Print or Export the view into Excel or other formats. Click Customise to change the columns displayed.
Customise
The Customise form allows you to select and change name of the columns and the report displayed in the Custom View.
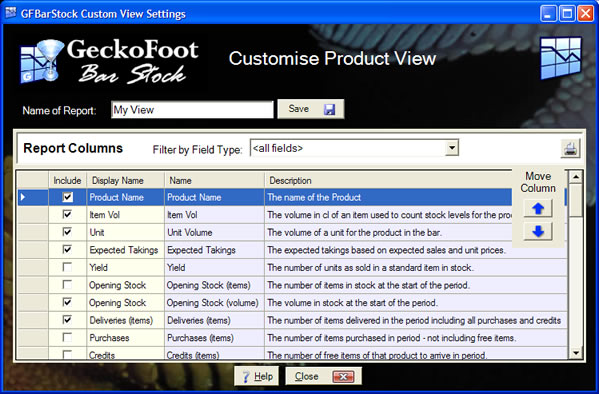
Customise View
Type in the name of the report and click Save to save the name.
You may filter by Field Type by selecting from the drop down list.
The Name and Description describe each column.
Check the Include check box to enable or disable the column in the view.
The Display Name shown on the column header can be changed. Type in the new value and move to the next element and the value is automatically saved.
Click the arrows to move the selected column forwards or backwards in the view.
Click close to finish the changes and the custom view will be updated.
Till Readings Form
The Till Readings form allows you to view, edit, import and add Till Readings to the system:
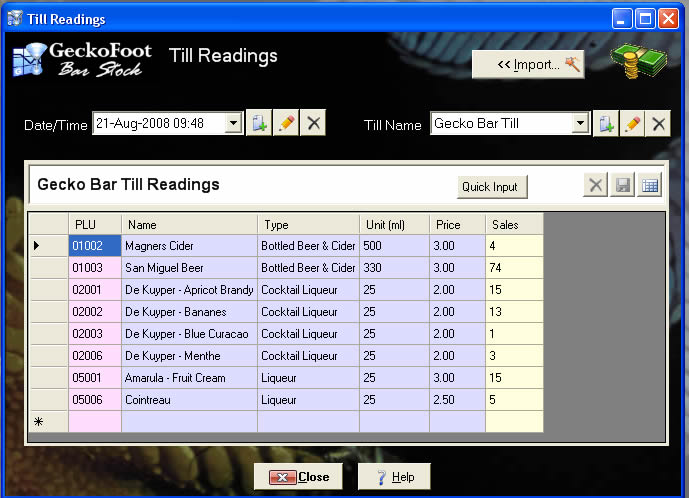
Till Readings Form
Select the Date and Time that the Readings were read or added to the system from the drop down list:
![]()
Till Readings Date/Time
Click ![]() to Add a new Reading Date/Time, click
to Add a new Reading Date/Time, click ![]() to Edit the current Date/Time or click
to Edit the current Date/Time or click ![]() to Delete the current Date/Time and any associated readings.
to Delete the current Date/Time and any associated readings.
Select the Name of the Till that the Readings are associated with - if you only have one Till or an integrated Till/EPOS system then this would normally be the default name "<Location Name> Till":
![]()
Till Readings Till Name
Click ![]() to Add a new Till, click
to Add a new Till, click ![]() to Edit the current Till Name or click
to Edit the current Till Name or click ![]() to Delete the Till and all associated readings.
to Delete the Till and all associated readings.
Click ![]() to Import Readings.
to Import Readings.
Till Readings View
Any Till Readings for the selected Date and Time and the specified Till will be shown in the Till Readings view:
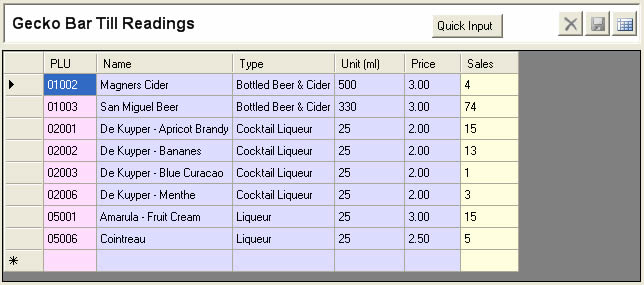
Till Readings Till Name
This contains the following collumns:
- PLU - The Price Look Up number which is used by Till Systems to identify a Product. PLUs are only used by BarStock to reconcile with Till Readings so this number can be changed to match your EPOS Systems.
- Name - the name of the product.
- Type - the type of product
- Unit - the volume of a single unit as sold by the Till System.
- Bar Price - the price of a unit sold.
- Sales - the number of units recorded as sold by the Till System.
Click ![]() to Export the view to Microsoft Excel.
to Export the view to Microsoft Excel.
You can delete readings by select whole rows and clicking ![]() :
:

Delete Readings
You can delete readings by select whole rows and clicking ![]() :
:
The quickest way to enter a lot of readings is by using the Quick Input helper. To show this click on the Quick Input button.
You can edit Sales figures for existing readings by clicking in the Sales box and typing a new value.
You can add a new reading by typing the PLU in the first box, when you tab away or leave the box, it will find a product with that PLU number and display the details:

PLU Entry
If the PLU code is unrecognised it will show an error icon in the box:

PLU Not Found
You can edit Sales figures for existing readings by clicking in the Sales box and typing a new value.
Click ![]() to Save your changes or click
to Save your changes or click ![]() to Undo changes and refresh the view.
to Undo changes and refresh the view.
Quick Input
Clicking on the Quick Input toggle button will show the Quick Input view:
This helps speed up manual input dramatically and is used as follows:
- Type PLU code and hit TAB or ENTER - Product Name is displayed.
- Enter number of Sales and hit ENTER - Row is added to Till Readings.
Focus is swapped between PLU and Sales, so you can continue to type in PLUs and Sales hitting ENTER in this way until you are finished and are ready to click to ![]() Save:
Save:

Quick Input
Till Reading Selection
The Till Reading Selection form is launched from the Analysis form's Till Reading View. The form allows you to select a set of Till Readings which should be part of the selected Stock Period.
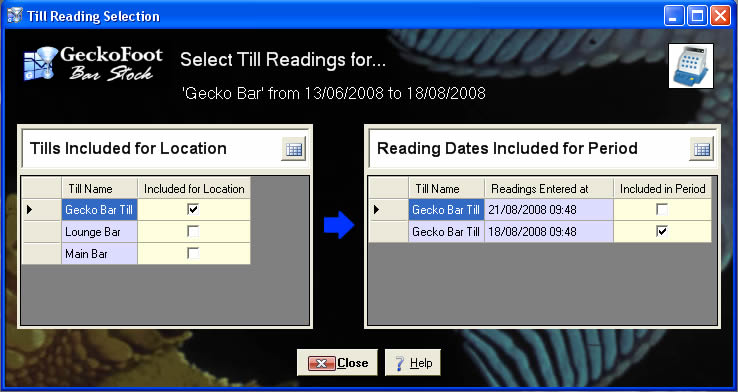
Till Reading Selection
Click the Till Included check box to include the specified Till for the Location and all the readings for that Location will be shown.
Click the Readings Included check box to include the readings entered at the specified date